
Floor stand
Assembly in eight steps
Everything you need is in the box — and one part you should leave in it. Work on a flat surface with the packaging under the parts so nothing gets scratched, and read the two notes below before you pick up a bolt.
- Time
- About 15–20 minutes
- Tools
- Hex wrenches supplied · bring a Phillips screwdriver
- People
- One
Two things to get right
Leave this one in the box
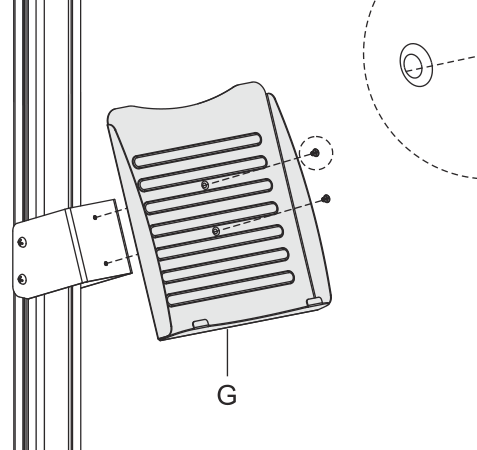
You do not need the literature holder
The stand ships with a document tray that bolts to the front of the column, plus the connector it clamps to. It is part of the generic stand, not part of a feedback kiosk — fitting it puts a plastic shelf directly under your survey and gets in the way of people using it.
Set the tray and its connector aside and skip steps that mention them.
Do this before the case goes on
Feed the cable through the column
The column is hollow so the charging cable can run up the inside and disappear. Run it down the outside instead and it dangles the full height of the stand, which looks untidy and gives people something to pull.
Thread it in step 3, before the case is bolted on — afterwards means taking the case off again.
Know the parts
Before you start
Lay the parts out and check you have all of them:
- Tablet case, front and back
- Column
- Weighted standing base
- Base connector
- Four rubber pads
- Four M8 base bolts
- Tablet adapters
- 5mm and 4mm hex wrenches
- Key
- Charging cable
Also in the box, and not used: the document tray, its connector and their bolts. Set them aside — see above.
Missing something? Tell us and we will send it out.
If you also have the printed Mount-It! manual, its step numbers will not match these. It covers the document tray and mounting options you do not need, and it has no step for the charging cable.
-
Step 1
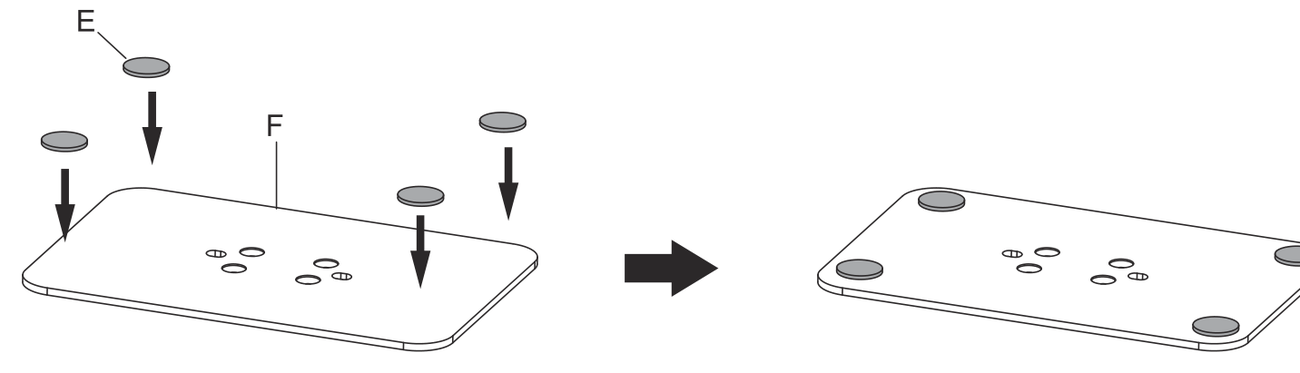
Stick the rubber pads on the base
Peel the backing off the four rubber pads and press one near each corner of the standing base, on the underside — the face with the recessed indentations.
-
Step 2
Bolt the column to the base
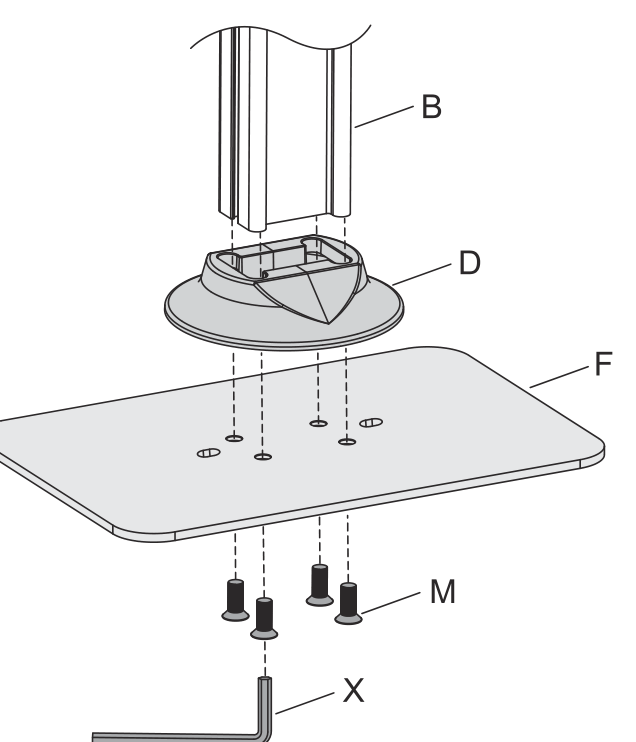
Turn the base right way up, stand the column on it, and fix the two together through the base connector with the four M8 bolts, using the 5mm hex wrench.
Tip Start all four bolts by hand before tightening any of them, then work in a cross pattern so the column seats square.
-
Step 3
Run the charging cable up the column
Feed the connector end in at the foot of the column and push it up the inside until it clears the top. Leave plenty of slack — you need enough to reach the iPad once the case is mounted. The plug end stays down at the base, so decide where the kiosk will stand first and leave enough of it to reach an outlet. Running the cable up the outside works electrically, but leaves it dangling the full height of the stand.
Tip Do this now, before the case goes on. Threading the cable afterwards means unbolting the case again.
-
Step 4
Unlock and open the case
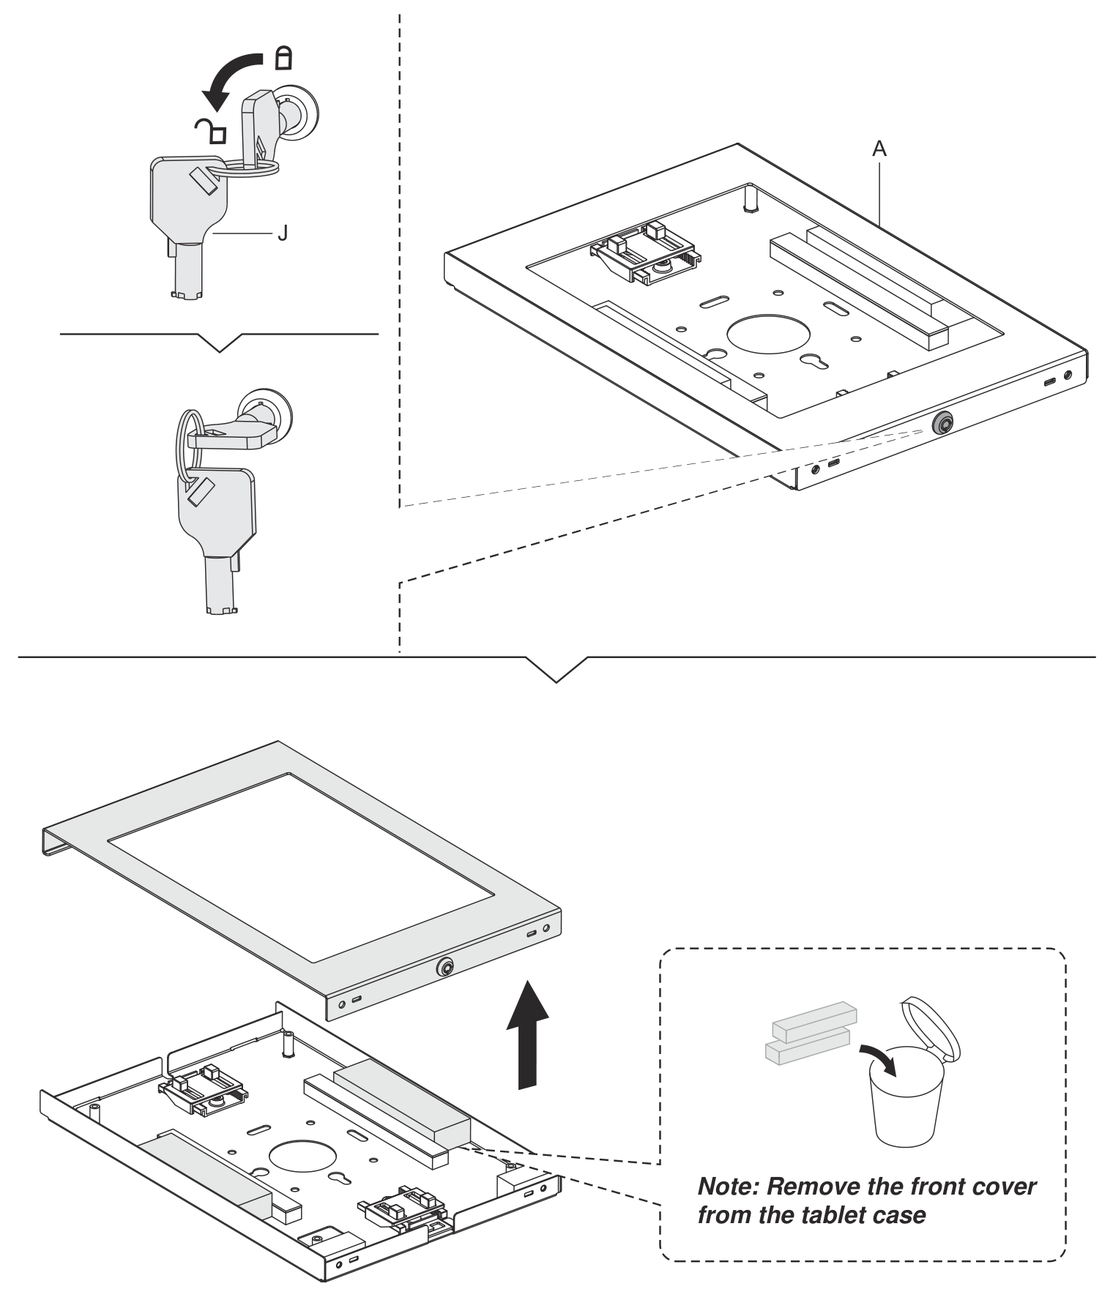
Put a key in the lock and turn it counterclockwise to unlock, then lift the front cover away and set it aside. Only the back half gets bolted to the column.
-
Step 5
Bolt the back of the case to the column
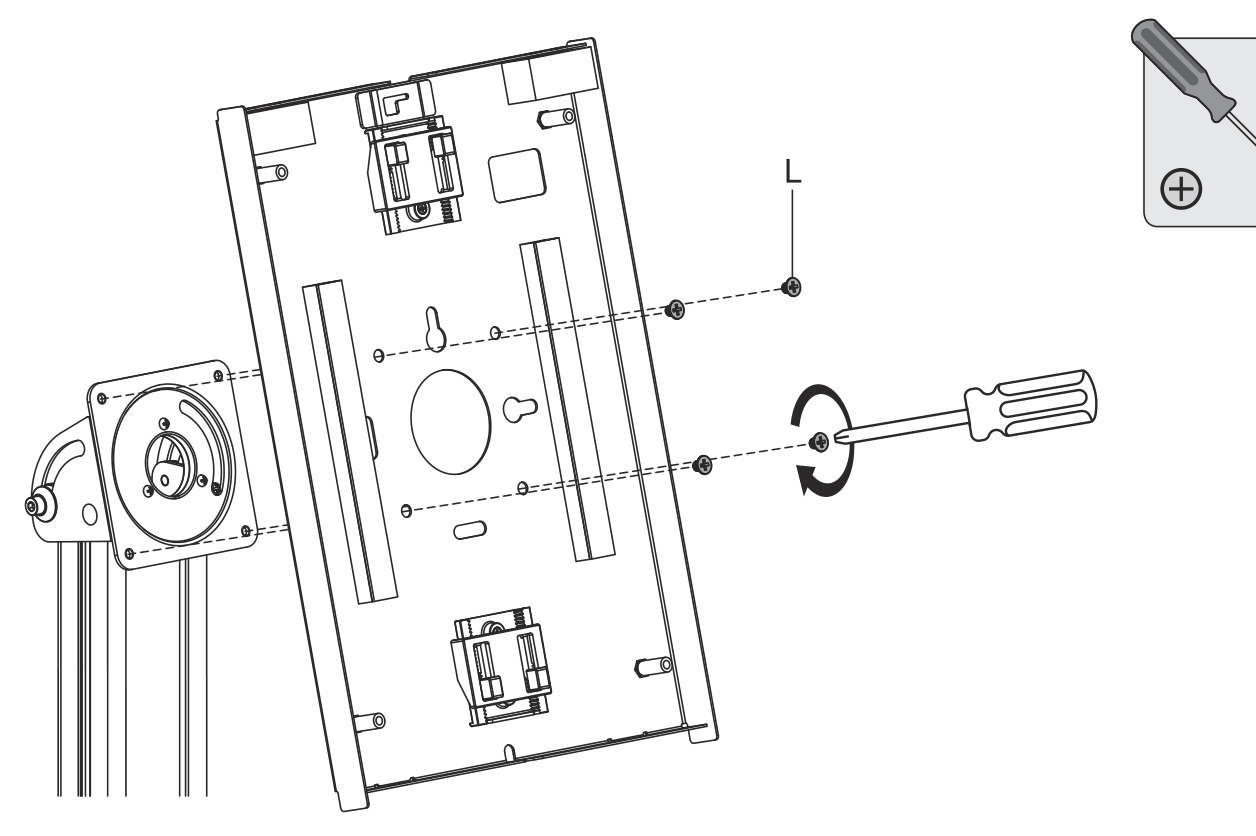
Line the four holes inside the back of the case up with the plate on the end of the column and fix them with the four bolts. Bring the charging cable through into the tray as you go, so the connector sits where the iPad’s port will be.
Tip Decide landscape or portrait now. The case rotates either way, but it is easier before the iPad is in.
-
Step 6
Fit the iPad in its adapter
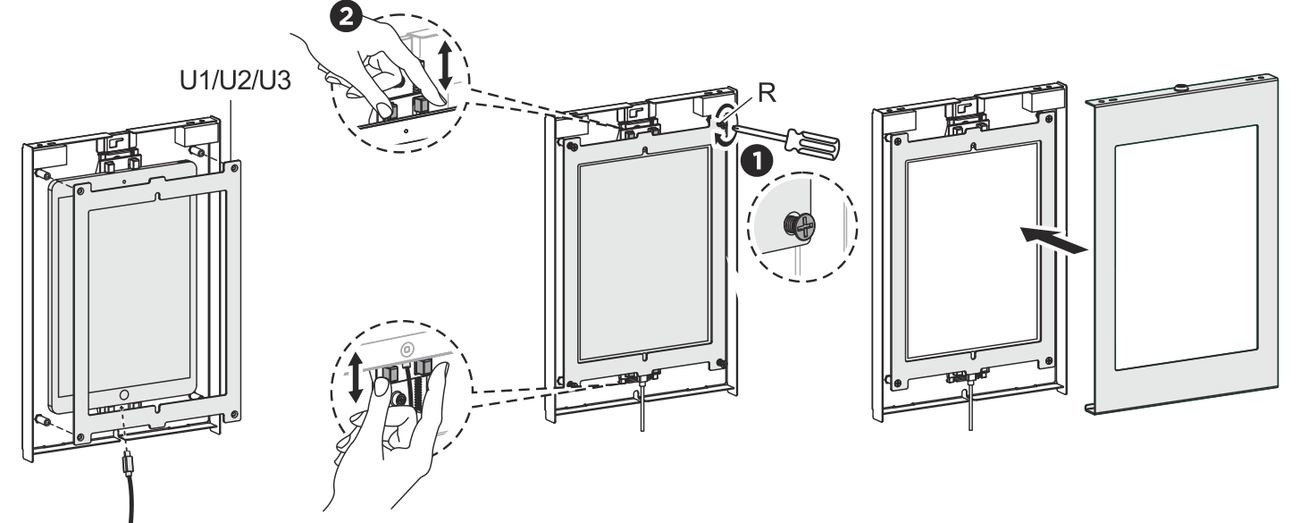
Pick the adapter that matches your iPad, sit the iPad in the case and fix the adapter over it with the four bolts. Before tightening fully, squeeze the tabs on the clamps and slide them left or right to centre the iPad. Then plug the cable in.
Tip Confirm the iPad is charging before you close the case — checking afterwards means unlocking and lifting the cover again.
-
Step 7
Close and lock the case
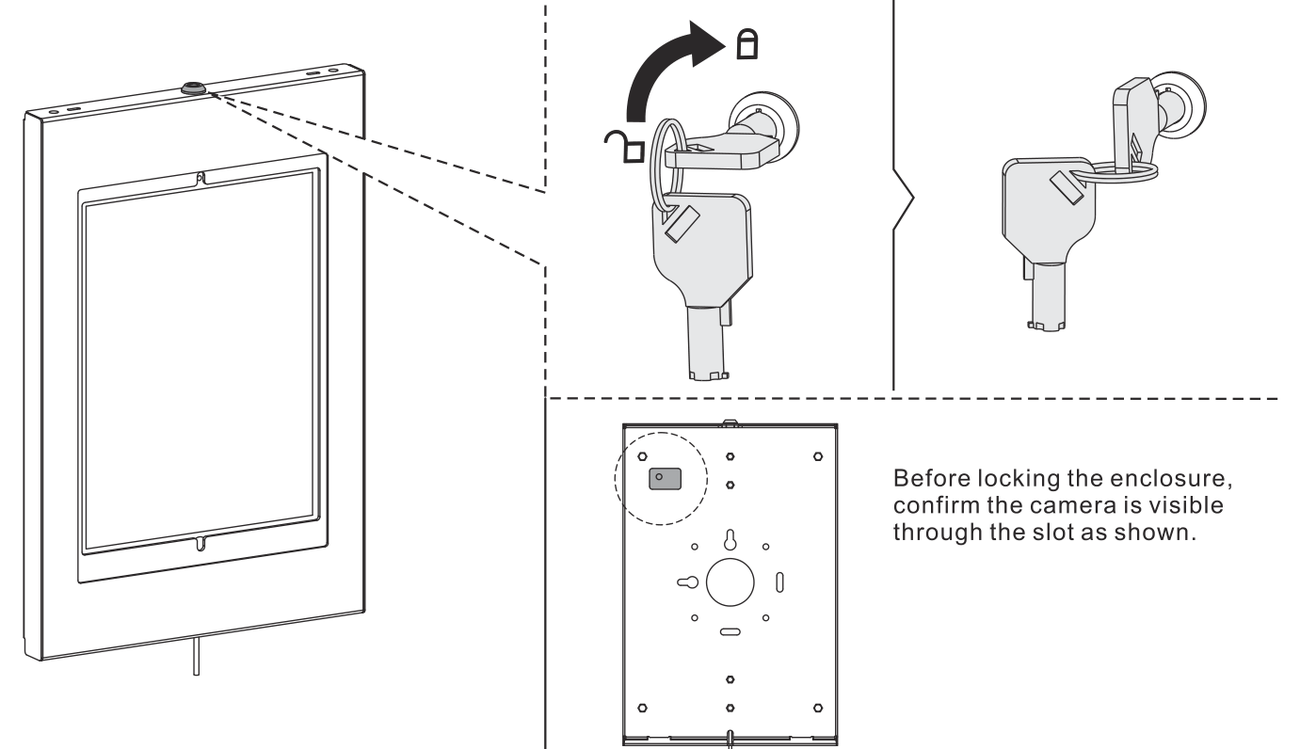
Bring the front cover back over the iPad and press the halves together until they meet flush all the way round. Turn the key clockwise to lock. If you need the front camera, check it lines up with the slot before you lock.
Tip If the halves will not close flush, something is trapped. Open up and check the cable rather than forcing it.
-
Step 8
Set the viewing angle
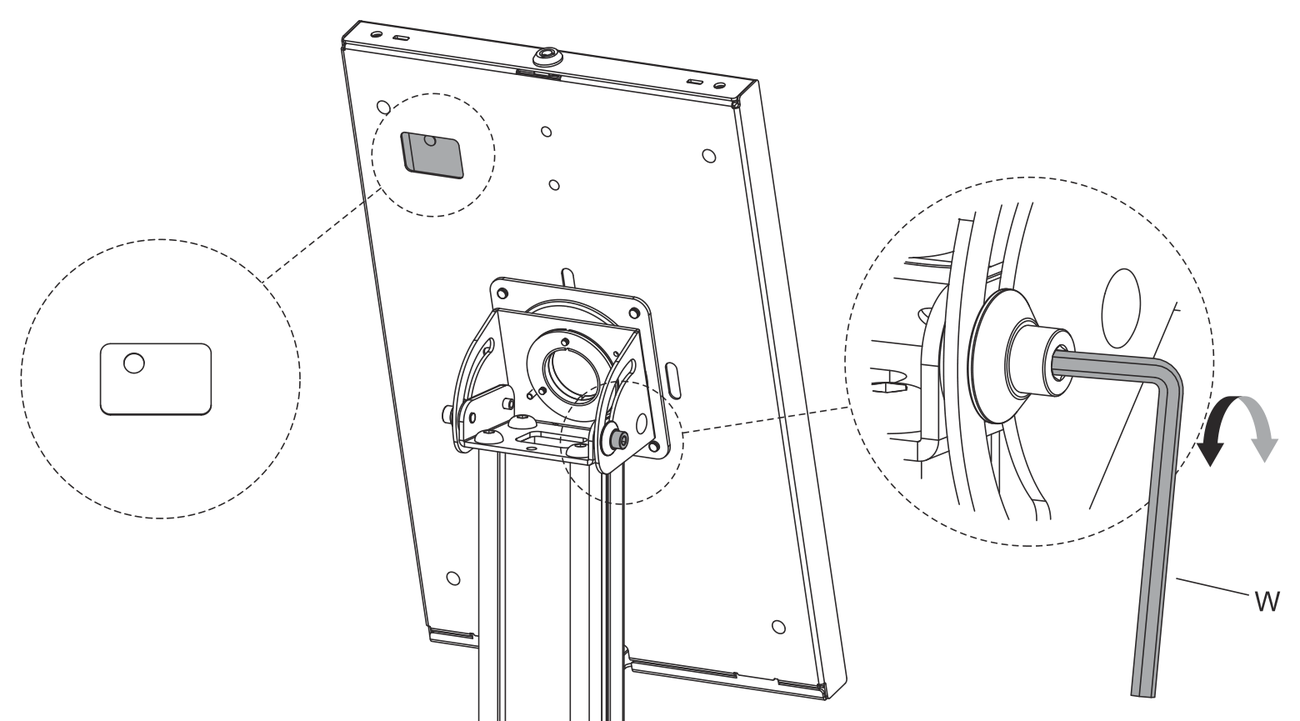
Stand the kiosk up. Loosen the bolt behind the case with the 4mm hex wrench, tilt the case to a comfortable angle — up to 75° — and tighten it back down. Then open the SurveyStance app and sign in to load your survey.
Which adapter fits your iPad
Three adapters ship with the stand and step 6 uses whichever matches your iPad. U1 and U2 fit exactly the same models — the only difference is whether the home button is reachable. For a kiosk, U1 is usually the one you want: covering the home button is what stops people leaving the survey.
| Adapter | Gives you | Fits |
|---|---|---|
| U1 | Home button covered | iPad Pro 10.5″, iPad Air 10.5″, iPad 7 / 8 / 9 10.2″ |
| U2 | Home button reachable | The same models as U1 |
| U3 | Front camera cutout on the side | iPad Pro 11″, iPad Air 10.9″, iPad 10 10.9″ |
iPad not on this list — an older model, or a mini? Send us the model before you build. The adapters are size-specific and the wrong one leaves the iPad loose in the case.
That’s the build finished
If anything did not go the way this page describes, tell us which step and we will talk it through — and fix the instructions.